 Photography is all about light. To get the exposure of our picture right, we need to balance the aperture size and shutter speed. This can become tricky in low light situations. If both aperture and shutter speed don’t suffice to get the exposure right, we can increase the ISO value. The ISO value is a measure for the sensitivity of the sensor. ISO stands for International Standards Organization.
Aperture
The aperture is the opening, iris or diaphragm after the lens. It controls how much light will fall on the sensor. With adjustable blades this aperture can be arranged in a limited number of sizes. These sizes are such that every next smaller opening halves the amount of light falling on the sensor. We measure the aperture openings as fractions of the focal distance of the objective.

Three apertures for a 50mm objective. From left to right: f/2.8, f/5.6 and f/22.
So we can use the aperture size as a control for the exposure of our picture. We can also use it to select which part of our picture will be in focus.
Shutter speed
The shutter speed (which isn’t a speed but an exposure time) determines how long we will let light fall on the sensor. Also the shutter speed can be chosen as one of a limited series. The different speeds are such that every next smaller number halves the amount of light falling on the sensor. So, we see something in common with the aperture sizes we can choose from.
Balancing aperture size and shutter speed
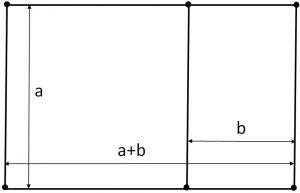
With every decrease in aperture size we halve the amount of light falling on the sensor. With every increase in shutter speed we double the amount of light falling on the sensor. So, this means that we can compensate a change in aperture size with a change in shutter speed. This is illustrated in the next figure. We use a seesaw as an analogy.
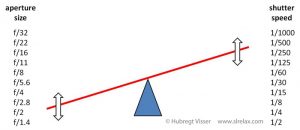
Seesaw analogy of the balance between aperture size and shutter speed.
If we move to the next lower exposure time, we need to move to the next higher value for x in the 1/x shutter time. So, the exposure time decreases and therefore the shutter speed increases. (Moving upward in the column on the right increases the shutter speed and lowers the exposure time).
To keep the amount of light falling on the sensor the same, we now have to increase the aperture size to the next level. This means that we have decrease y in the f/y aperture size.
The easy way to deal with this (throwing physics over board) is:
A faster shutter speed (larger numbers in the shutter speed scale), leads to a lower aperture number.
Every change in stops (up or down) in aperture or shutter speed needs to be compensated by an equal mount of stops in the other in the opposite direction.
ISO
So, in principle, for every situation you can find a number of aperture and shutter speed combinations that ensure a correct exposure. For photographing fast moving objects or persons (sports) you can start with a fast shutter speed to ‘freeze’ motion and adapt the aperture to that. For isolating persons or objects from the background you can start with selecting the aperture and adapt the shutter speed. The shutter speed should not go beyond where you can still take sharp shots handheld. This will bring you into problems under low light conditions.
Fortunately we have another dial at our disposal. That’s the sensor sensitivity, measured in ISO. The sensor of our camera registers the amount of light falling on it and translates that in voltages and currents. The camera processes these voltages and currents to deliver the picture we will finally see on the screen. If the voltages and currents are low – as in low light conditions – they can be amplified.
The base ISO value for most cameras is ISO 100. For every doubling of the ISO number (amplification) the captured light amount doubles. So, we can use the ISO dial to balance the aperture size or the shutter speed just as we balanced the latter two. In the seesaw analogy this will look like this
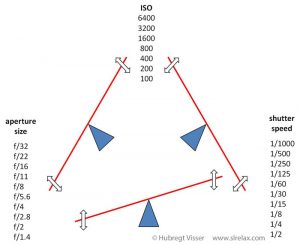
Seesaw analogy for balancing shutter speed, aperture size and sensor sensitivity (ISO).
Thus, to compensate for a higher shutter speed (shorter exposure time) we can increase the ISO value. To compensate for a higher aperture value (smaller aperture size) we can also compensate with a higher ISO value.
Shutter speed, aperture and ISO
To summarize, for the same exposure:
- shutter speed up –> aperture number down and/or ISO number up
- shutter speed down –> aperture number up and/or ISO number down
- aperture number up –> shutter speed down and/or ISO number up
- aperture number down –> shutter speed up and/or ISO number down
So, everything is OK now? We can take pictures in all light situations?
Well …, yes and no.
Noise
Just as for audio, amplification introduces noise. This noise is visible in a picture as a random variation of brightness and/or color. It resembles the grain in pictures from negative film. We generally experience noise as more ugly though. An example is shown below.
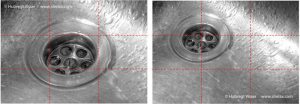
Example of noise. Camera: Nikon D200. f/5.3, 1/60 sec. ISO 1000. Detail 100%.
Noise is more visible in dark areas than in light areas. It also depends very much on the camera. Camera manufacturers have done a great job in improving the noise reduction. With modern cameras we can now photograph in low light situations where we could not, not so long ago.
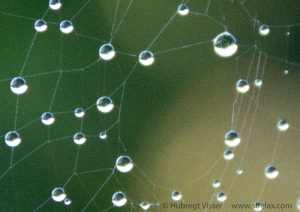
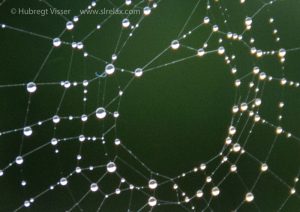
To illustrate this, the next figures show 100% details of a spider web photographed with a Nikon D7200 camera for different ISO settings.
Examples
We start with ISO 200. This is not the lowest value possible, but going lower did not give me a less noisy picture.
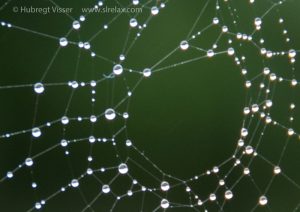
ISO 200. f=200mm, f/5.6, 1/50 sec.
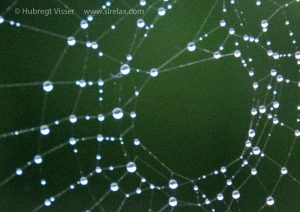
Next, we move to a value that still produces a near-noiseless picture. All intermediate values do not show any change.
ISO 800. f=200mm, f/5.6, 1/200 sec.
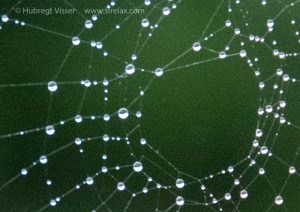
Then we move to the first value where noise is visibly introduced.
ISO 3200. f=200mm, f/5.6, 1/640 sec.
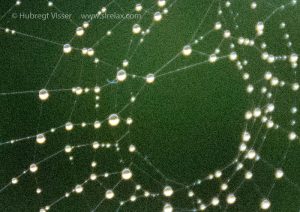
We double the value and see an increase of noise.
ISO 6400. f=200mm, f/5.6, 1/1250 sec.
Doubling again further increases the noise.
ISO 12800. f=200mm, f/5.6, 1/2500 sec.
The final value results in the following amount of noise.
ISO 25600. f=200mm. f/5.6, 1/5000 sec.
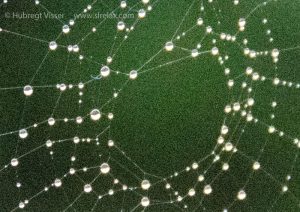
If we compare the noise behavior of the D7200 with that of the D200 we see how noise reduction has improved over the years. The noise at ISO 25600 looks bad, but we have to consider that we are looking at a detail on 100% enlargement. Therefore, as a last example, we show the whole pictures side-to-side at ISO 200 and at ISO 25600.

Complete spider web picture. Left: ISO 200. Right: ISO 25600.
We see that for small prints the difference is very hard (if at all) to see. But then, this is for the state of the art at the writing of this post. If you have an older camera, the noise may become visible at a much lower value.
How to work with aperture, shutter speed and ISO in practice
There may be different ways to work with aperture, shutter speed and ISO settings. The way I work with the settings that control the exposure works well for me. It is based on working with an older (more noisy) camera:
- I start with defining the aperture to create the DOF I want.
- Then, looking at the light meter in the viewfinder (I hate live view) I choose the correct shutter speed.
- If I end up with a shutter speed that makes the success of taking handheld shots questionable, I increase the ISO value.
Of course you could let the camera make all these decisions for you. Cameras have become very smart and -in general – will choose an excellent setting. However, by using Manual mode you will have full control. This can help you in tricky light situations and will give you more creative means. For example, sometimes you want to have movement in your picture.
The way I started with photography was using Automatic mode. I let the camera decide on aperture, shutter speed and ISO value. Very soon I switched off the automatic ISO setting, since it gave me too often too noisy pictures (using a Nikon D70S and later a Nikon D200). Then I moved to Aperture Priority. In this setting (again with a fixed ISO value) I choose the aperture and let the camera decide on the shutter speed. Finally I moved from there to Manual mode. I’m only using the light meter and the auto focus from the arsenal of automated functions. All steps were rather natural. Only the last step – going to Manual – brought me out of my comfort zone. But with a little perseverance I learned to get used to it and now I like the full control it gained me.
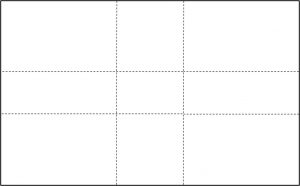
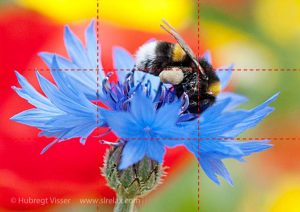
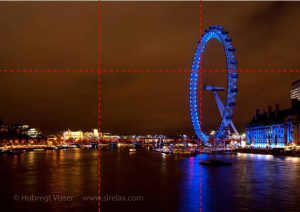
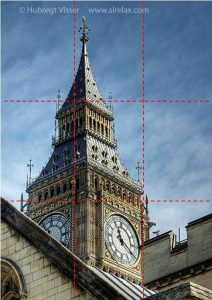
 When you are interested in photography you will start reading books on the subject or browsing the web. Eventually you will encounter the rule of thirds. Or maybe, when playing around with your camera settings, you found this grid you can overlay on your screen or viewfinder. You may have wondered about the use of it. Both have to do with picture composition and creating appealing pictures.


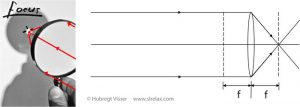
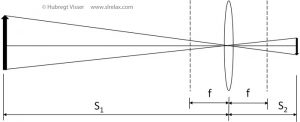
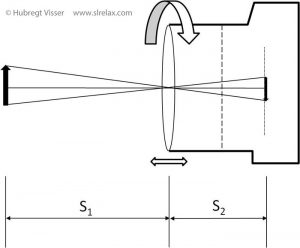
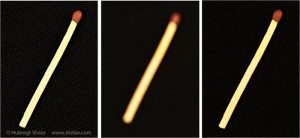
 Through selecting the range of focus in your picture, you can draw attention to the elements you want to emphasize. You can accomplish this by selecting the focal point and by choosing the appropriate aperture size. Understanding Depth Of Field (DOF) is a powerful creative tool. We will explain how decreasing the aperture size may compensate – to a certain degree – being out of focus. Therefore we will go through some (very) basic physics, starting with the concept of focal distance.